Posts tagged quilting
Aunt Mode: Classic Pooh Heirloom Quality Quilt

When I received the news a special friend was expecting I couldn’t get to the quilt store fast enough. My inspiration came from my friend’s vision for her nursery - classic Winnie the Pooh colors.

For this quilt, I finished with silk edges for snug-able, chewable binding. I attempted for the first time a diagonal orientation for the squares. To me, this is an extra wow factor and something I haven’t tried before. It does mean losing some fabric on the edges.

I did have to pace around the house a few times before I made this cut. Creative risks pay off. It certainly adds a bit of interest on an otherwise classic design

When I make a baby quilt, one of my goals is to create a heirloom quality blanket so it can be loved for a long time or passed down. Because of this, I choose fabrics that have a timeless quality. (Can’t go wrong with gingham.)

The meandering stitching is abstract and one of my favorite things to do on a quilt. I don’t use a long arm, just my standard juke machine, patience, and a bit of arm strength.

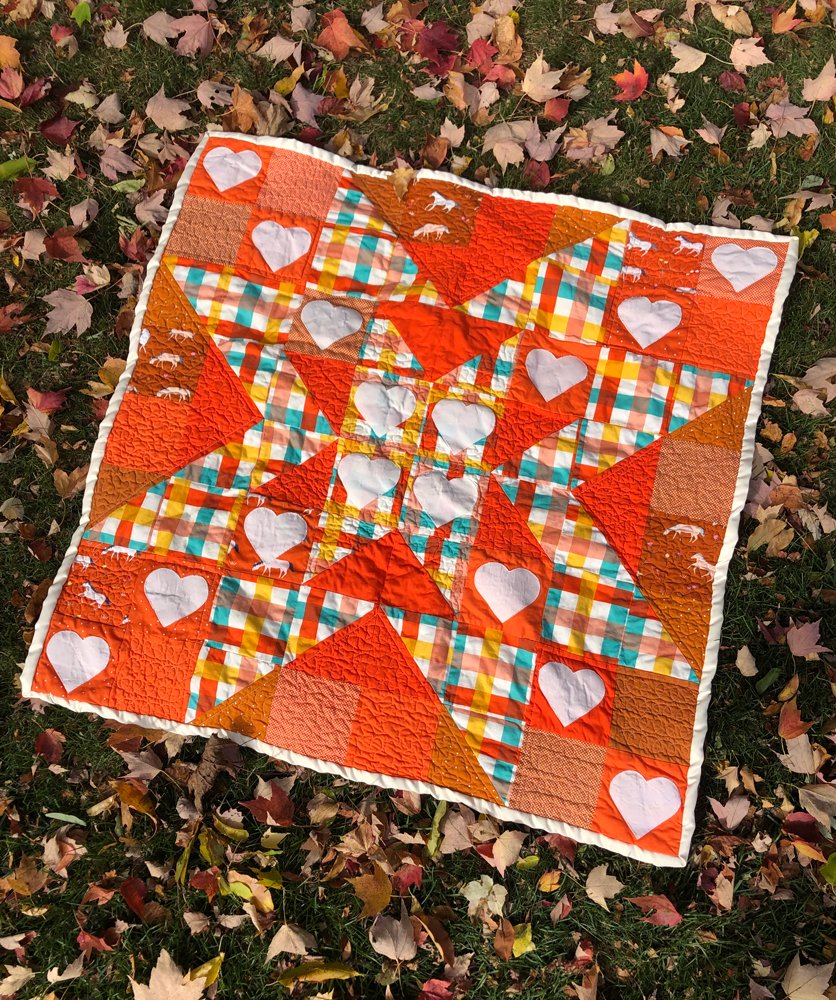
I have this habit of making a quilt for someone I love and then deciding it’s not good enough to give. Perfectionism gets the best of us! This plus quilt below is the first one I made, its color is a little brighter.

I love the plus design, which I find both classic and modern. Unfortunately, I don’t have a full picture of it completely finished. (Some baby’s timeline do not line up with mine ;) I ended up adding straight stitching in stripes with the meandering in stripes running in another direction. The look came out almost plaid-inspired and worthy of snuggles. Will use this idea again.

Both quilts are being loved on now by friends I love so much. Until next time.

THE MEGA PUFF

Hello from Stag Studios!

BIG news today, we have adopted a new backyard friend who likes to kick it on the spa. Yep, we are in love.

Today, I’d like to share more details about my puff quilt that I shared on my June 23rd studio update. I was really inspired to do this project, everywhere I looked I was seeing puff quilts and they all look like pillows of heaven! I know what it’s like to sew a large quilt but adding more weight to an already tough task was intimidating!

One of the reasons I wanted to create this quilt was for our salvaged/repurposed outdoor sofa needed more padding! I thought a big puff quilt will be perfect. If you didn’t see my post about our dumpster couch you can check it out here:

There are great tutuorials out there for puff quilts but I rarely like to follow directions. Instead, I read patterns and watched tutorials online, and dove into making some of my own prototypes. My great-grandmother’s quilts were “puff” quilts but used triangles, so for my prototype, I experimented with using triangles. See a picture of my grandma’s quilt here.

I loved the look but knowing I was going for more cush on the outdoor sofa, I went with a square for more puff and I made my squares much larger than any pattern I’ve seen out there. To keep a nice shape, I lined the top layer of the quilt in warm and white batting before forming the full square and stuffing!

Evan helping me with the stuffing (below.) There’s an art to not stuffing too much so you can sew the puffs together but not under stuffing them either!

This was the most exciting part for me, seeing all the puffs stack up! As I made more and more, yes I did take the opportunity to throw them in the air with glee. Why not. :)

This quilt laid on the floor for about a week as I moved around the color. I know, most quilters know how their quilt will lay out from the start but that’s just not how I work. I like to play with my colors and see what I can come up with.

I ended up arranging the poofs in an ombre of sorts. The next step was to sew them all together. Holding the poofs together was nearly impossible. Really, there were several nights I told Evan I was going to give up on the puff quilt!

After a lot of frustration I had an idea, I dug into some of my painting supplies to find these heavy duty clips I use to hold and stretch canvas. The “little clip that could” and “big daddy clamp” worked wonderfully. Along with some extra hands (thanks Evan) every puff got secured.

Next time, I will likely sew them in triangles as my great-grandmother did. I will also consider including more hand sewing. For this job, the big puffs help the comfort of our seating but I don’t see it as an easy blanket to wrap and use. Lining the top layer of the puff was a good idea but it does add extra weight, something to consider for my next one.

The puff quilt is a favorite of our dog Maisey and saved our backs on a recent vacation. Our AirBnB had bad mattress, we slept soundly on the puff quilt we brought with us “just in case.”

Have a great rest of your week! I’m busy working on some sketches this week and doing a bit of knitting. Will share more soon.

xx

Kirbi


Living Canvas Collection: Rainbows Continued

Dear Readers,

The world is covered in snow but in the studio I’m singin’ about colors…

Living Canvas is all about me embracing all sides of my creativity, letting one project inspire the next in whatever medium that calls to me. I let my new rainbow quilt, which you can see in more detail here, be my inspiration for an illustration. I started, like I usually do, by sketching on my iPad in procreate.


My rainbow quilt makes me so happy, it just tickles me when I seeing all the colors lay around the house. I wanted to create a piece that was about hope - something we all need right now, that I could share on the web to lift spirits. One of my first concept sketches is shown below. I thought drawing my quilt waving in the wind while a young character holds it running would tell my story…

But this type of carefree, bright day wasn’t connecting with me. Collectively we are “hanging in there,” many of us in the midst of the darkest part of their lives. I sketched more until I realized this required a portrait, a face that says, it’s going to be alright. And she splashed out of my pen…

Everything felt right, I went to final, enlarging the drawing onto to some vellum. Colored pencils take a lot of a layers, so I like to lay down a layer of air brush with a copic marker airbrush attachment (Kindly gifted to me from Copic.) In bolder areas, I put marker directly onto the vellum.

Then I build up the colored pencils, moving a small circular motion. Each area has about 9-12 layers of color. It has been some time since I’ve done a full colored pencil piece. I found these pencils in the bottom of the barrel chewed my family dog, I couldn’t part with them… I’m guessing they are from around 2009. Anyone else’s dog just LOVE prisma colored pencils?

I fell into a rhythm of blending colors and sharpening pencils.

When I finished, I scanned the drawing into my computer and added text. Hold on everyone, we will get through this. I really believe that.

Living Canvas Collection: Rainbow in Pastels

Pastels make my heart melt. When I found this rainbow jelly roll at my local fabric store, I had to have it. I had no idea for WHAT but I bought it anyways.

I was so inspired, I painted my nails to match. That’s what LIVING CANVAS is all about, letting my art spread to all areas of my life, in whatever way it feels good.

So I quilted. And I can’t really tell you what a silly delight it was to sew with matching nails, I was giggling out loud! Listen, my machine had some severe issues as you can see below, is there any project that doesn’t have some DRAMA along the way!? If you’ve managed any creative project that went smooth start to finish, please write me.

I ended up removing one of the kelly green colors from the pack, I wanted a softer rainbow. This roll also did not include red, for this look that kept the intensity of the colors duller. Because this is one of the first quilts I’d done, I decided to do a combination of hand stitching and machine work to baste the fabrics. Hand stitching was the MOST enjoyable experience, it reminds me of the control you need to draw. I got lost in meditation making one stitch at a time. Had to go with rounded corners as I can’t get enough of that look.

The binding. I picked something cheerful for the edges. These tiny stitches are to die for. There’s something special about this kind of detailed work. While the stitches are small, it provides strength to the edges that will be tugged on. While I have recently learned how to do this on my machine, the look of this is so nice it’s worth the time and after working each stitching myself, I’m confident it will last.

Another look at that binding. Going with a neutral pattern on the edges tones down the wildness of the rainbow.

Below shows you the finish after the “great wash” that produces all the yummy quilt-y wrinkles. Evan had to hold this one up to be able to capture its length. It’s a great size quilt for one or for two who love to be close. <3 A few bits of dirty laundry on the floor for ya to keep me humble.

I leave you with words from Dolly, “The way I see it, if you want the rainbow, you gotta put up with the rain.”

Ain’t that the truth.

-Kirbi