Triangle Color Blocks For Baby

Hello from Stag Studio!

I spent the weekend sewing through the winter storm and I’m sharing a quilt FAIL that taught me a whole bunch and gave me new inspiration.

First, the quilt fail - it was my first time using gauze. Soft, delicate - I had to try it. I buy my fabrics locally and not one of my go-to stores had gauze. When I finally got my hands on it and finished the project, I learned it requires a top stitch, not a traditional edging. Below, you can see how after the wash the gauze shrunk and pulled away. I had anticipated this so I used a zigzag stitch but even so, it was fray city! I should have listened to Melanie Ham!

It can be a bummer when a thing doesn’t turn out but I’ve ruined so many paintings and drawings, I know that it’s a part of being creative. An instructor at art college told me, “you will learn more by finishing something than starting over.” I don’t abandon projects, I always use the rest of the project to practice and learn. I’m a finisher. The good news is, that when I make big mistakes like this, what I learned sticks with me.

The blanket plopped into the scrap pile but I still wanted to complete a project with the colors I was working with. I was planning to make a quilt for a friend’s new babe and decided to use the same colors. I bought my fabric in solids and quickly decided on triangles. Jotting down a pattern for myself - the cutting and sewing became straightforward.

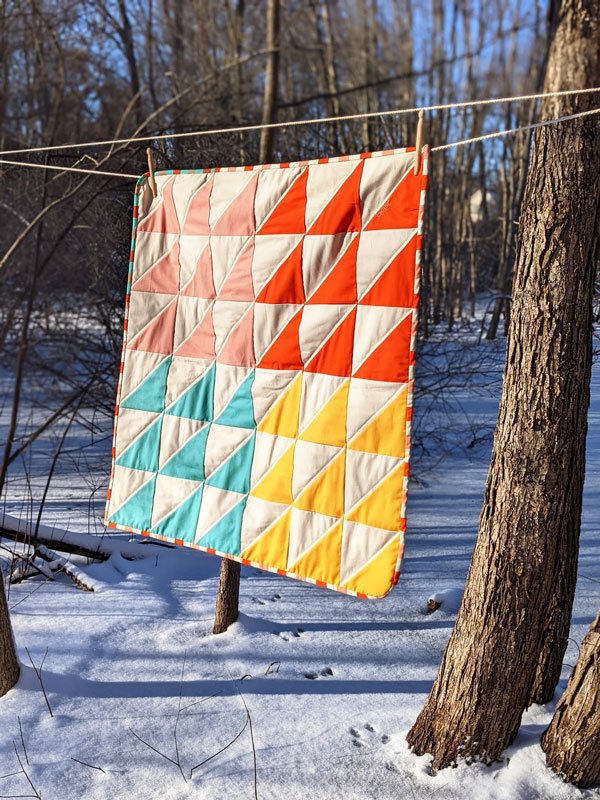
The triangles look modern, especially in bold colors against the cream. Still, the piece has that “quilted” feel. The color blocking also enhances the mod look and I think looks perfectly playful for baby.

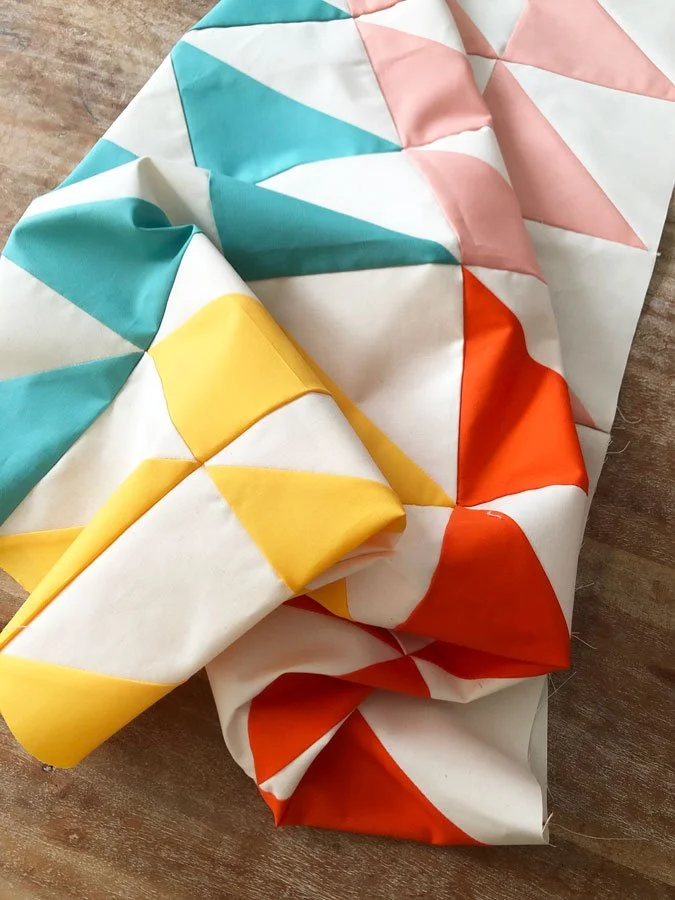
I quilted using a golden thread, bravely sewing on the diagonal. Admittedly, this was a last-minute choice - no regrets!

A part of this quilt that may be overlooked is how I used rounded corners on two sides of the quilt. It created a swath shape and enhanced the "mod” feel of the quilt.

Stay warm out there snow bunnies!

Sending smiles,

Kirbi

Living Canvas Collection: Rainbows Continued

Dear Readers,

The world is covered in snow but in the studio I’m singin’ about colors…

Living Canvas is all about me embracing all sides of my creativity, letting one project inspire the next in whatever medium that calls to me. I let my new rainbow quilt, which you can see in more detail here, be my inspiration for an illustration. I started, like I usually do, by sketching on my iPad in procreate.


My rainbow quilt makes me so happy, it just tickles me when I seeing all the colors lay around the house. I wanted to create a piece that was about hope - something we all need right now, that I could share on the web to lift spirits. One of my first concept sketches is shown below. I thought drawing my quilt waving in the wind while a young character holds it running would tell my story…

But this type of carefree, bright day wasn’t connecting with me. Collectively we are “hanging in there,” many of us in the midst of the darkest part of their lives. I sketched more until I realized this required a portrait, a face that says, it’s going to be alright. And she splashed out of my pen…

Everything felt right, I went to final, enlarging the drawing onto to some vellum. Colored pencils take a lot of a layers, so I like to lay down a layer of air brush with a copic marker airbrush attachment (Kindly gifted to me from Copic.) In bolder areas, I put marker directly onto the vellum.

Then I build up the colored pencils, moving a small circular motion. Each area has about 9-12 layers of color. It has been some time since I’ve done a full colored pencil piece. I found these pencils in the bottom of the barrel chewed my family dog, I couldn’t part with them… I’m guessing they are from around 2009. Anyone else’s dog just LOVE prisma colored pencils?

I fell into a rhythm of blending colors and sharpening pencils.

When I finished, I scanned the drawing into my computer and added text. Hold on everyone, we will get through this. I really believe that.

Living Canvas Collection: Five Special Dolls

Dear Readers,

Over many years creating art, I tried to keep my crafts, like knitting and beading separate from my illustration work. In fact, for a long time I didn’t even keep the supplies for my “crafts” in my studio. But then I got more hobbies, miniature gardening, quilting, doll making, paper crafts… the list goes on. I threw my hands up and realized my whole life is a canvas. Whatever I make, I bring a touch of creativity to it. This project I’m sharing today brings together sewing, pattern making, drawing, color theory… and most of all MY HEART! <3

My husband’s beloved grandmother, Millie, passed away late last year. Due to my health situation I had to remain home for the funeral - it was painful not to be together, a feeling many people are familiar with during these times.

Millie’s story is one of insurmountable strength. She traveled by herself with two littles by boat to the US - it’s only the beginning of her amazing story. My father-in-law brought me back some of Millie’s clothes, knowing I may enjoy the fabrics for my sewing projects. I immediately wanted to make a doll for each of my aunts using Millie’s clothes.

The colors of the clothes were eclectic so I had to put on my thinker to figure out how to make cohesive outfits for the girls. Each dress turned out so different so I thought their faces should all be unique too.

I draw on the faces before the dolls are stuffed with a small fine tip pen.

My Mom and I decorate and rearrange a lot. It’s something I’ve done with her since I was little. One of our theories is that if a color isn’t working, sometimes you just need MORE of it… The red and green combo I was most worried about. I used our theory, and added MORE. Like most outfits, it starts with a great pair of shoes.

Red on the edges, red buttons, red roses —it snapped together. This idea I now know is called color harmony and repetition but I learned about it long before art school.

Is there anything quite like finding the perfect accessory? I found this jewel-y green button in a bag of 1500 buttons I bought. Yep, I’m the kind of person that buys 1500 buttons. Out of boredom that comes with pandemic life, I asked Evan if he’d like to sort the buttons with me. I got turned down (LOL) but I hey, I found this button! Doesn’t it look so with these colors? It ties in the green and purple nicely.

I wanted to bring as much meaning into the dolls I could. I carefully pulled off buttons of Millie’s shirts and sewed them in the hair here, using every bit of the clothes I could.

Feet details (and yes matching nails!)

I never know exactly how the face is going to look until she’s stuffed and the hair is. She melts me!

On this doll below, I love how the form of the shirt is still visible. You can see some of the seam and a button from the cuff on the right side of the doll’s skirt.

Lace and beaded floral accents below.

I’m not sure when I’ll be able to give these dolls to my aunts in person but this will give them time to decide who gets which!!! Kathy, Myra, Susie, Anna and Mary… I love you and a hope these dolls reminds you of your kind and God fearing Mum. She will be missed.

Living Canvas Collection: Rainbow in Pastels

Pastels make my heart melt. When I found this rainbow jelly roll at my local fabric store, I had to have it. I had no idea for WHAT but I bought it anyways.

I was so inspired, I painted my nails to match. That’s what LIVING CANVAS is all about, letting my art spread to all areas of my life, in whatever way it feels good.

So I quilted. And I can’t really tell you what a silly delight it was to sew with matching nails, I was giggling out loud! Listen, my machine had some severe issues as you can see below, is there any project that doesn’t have some DRAMA along the way!? If you’ve managed any creative project that went smooth start to finish, please write me.

I ended up removing one of the kelly green colors from the pack, I wanted a softer rainbow. This roll also did not include red, for this look that kept the intensity of the colors duller. Because this is one of the first quilts I’d done, I decided to do a combination of hand stitching and machine work to baste the fabrics. Hand stitching was the MOST enjoyable experience, it reminds me of the control you need to draw. I got lost in meditation making one stitch at a time. Had to go with rounded corners as I can’t get enough of that look.

The binding. I picked something cheerful for the edges. These tiny stitches are to die for. There’s something special about this kind of detailed work. While the stitches are small, it provides strength to the edges that will be tugged on. While I have recently learned how to do this on my machine, the look of this is so nice it’s worth the time and after working each stitching myself, I’m confident it will last.

Another look at that binding. Going with a neutral pattern on the edges tones down the wildness of the rainbow.

Below shows you the finish after the “great wash” that produces all the yummy quilt-y wrinkles. Evan had to hold this one up to be able to capture its length. It’s a great size quilt for one or for two who love to be close. <3 A few bits of dirty laundry on the floor for ya to keep me humble.

I leave you with words from Dolly, “The way I see it, if you want the rainbow, you gotta put up with the rain.”

Ain’t that the truth.

-Kirbi

New Year's Project

Hello!

My sister and I have been stitching and sharing our work over text. It’s been a simple delight and a fun way to spend the evenings on the couch. I decided to make a template for a monthly embroidery journaling project. Each month offers blank space to try out designs, practice stitches — anything you want!

I drew the design in my cricut design software and had the machine draw it onto fabric. I’m using a Kona fabric, my favorite brand, 100% cotton.

On my first try, I realized that I didn’t give myself enough room on the edges to fit the hoop to be comfortable to work with. Oops!

Let’s try that again…. Much better.

I’m new to embroidery. When making my first quilt I hand sewed the edging and it was my favorite part. So meditative (and you get to be under a blanket while you do it!) It gave me some confidence that if I could do that I could do embroidery. So, if you’ve never done it - GO for it!

Here is JPEG you can print out at whatever size you’d like and trace on to fabric using a water soluble marker (you can find at any craft store!) Or upload this image to your cricut and let the machine do it for you! Be sure to use the water soluble cricut marker!

Below is how it looks in my set up screen. Leave room for your hoop!!

Happy stitching! If you end up working on this I hope you’ll share it with me! Tag me on instagram @kirbifagan